To read a Multi schema Positional file we will use tFileInutMSPositional component, this component gives ability to read multiple schema based on certain columns value.
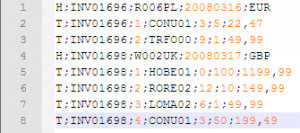
We are using Invoice file which has Invoice Header & invoice Details records in single file.
Sample file.

Invoice Header records start with “H” alphabet.
Invoice Details records start with “T’ alphabet.
follow the steps to read these multi schema records.
- Create a job and add tFileinputMSPositional component.
- Configure tFileinputMSPositional component with.
- provide file Name.
- row separator as per your file defaulted to “n”
- “Header Filed Position” this is the most important filed by which component will distinguish records whether it is header or detail. in our case first letter of row which is “H” for header and “T” for detail. so we will add value as “0-1” that means start of record to 1 character long.
- In “Records” section add two rows name it as “header” for Header records and “details” for Details record.
- once you add row it will ask you for schema add Header schema like below.
-
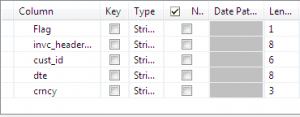
Header Schema - Create details schema as follows.
-
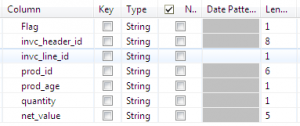
Details Schema - Now add pattern for “header” as “1,8,6,8,3”.
- Add pattern for details as “1,8,1,6,1,1,*”.
- now our configuration completed.
- Add two tLogRow component and from settings tab select “mode>Table”
- Connect first tLogRow to the tFileInputMSPositional using “Header” link.
- Connect Second tLogRow to the tFileInputMSPositional using “Detail” link.
- Synch tLogRow columns.


Execute the job. It will show you below output.