How to Add Header and Footer to a File

I will demonstrate you, how to add custom header, footer to file. This is the often required functionality for file processing and validation.

Requirement: Create delimited file with below structure.

Header Part

File Name: Name of the actual File.

PID : process ID.

Header Columns.

Body Part

Text Data. 

Footer Part

File Created Date: Date & Time.

Number of Records: record count.

This is our final job design.

Final Job Design
Final Job Design

Step 1: We`ll create Header part first.

Step 2: Add tFixedFlowInput component and configure as below.

  • Add one column “value” with string type.
  • Select “Use inline table” option and add three rows.
  • Add each line of below code to the each line we created previously.

"File Name: CustomerDetails.csv"

"PID :"+pid

"Id,Name,City,State,Street"

  • See the image for more details.
tFixedFlowInput Setting

Step 3: Add tFileOutputDelimited and connect with tFixedFlowInput component using Main flow, then configured as follows.

  • Add file path name “C:/home/CustomerDetails.csv”.(you can change this)
  • Row separator=”n”
  • Field Separator=”,”

Step 4: Add tRowGenerator and configured as explained in previous blog post.

Step 5: Copy Paste tFileOutputDelimited_1 component which we have created in Step 3, then connect  tFileOutputDelimited_2 with tRowGenerator using main flow. Configure as follows.

  • Select Option “Append”.
  • Click on  “Main” flow and go to the “Advance setting” tab and select option “Monitor this connection”.
  • Unchecked “Use Input Connection as Label”. it will show you a “Label” and text box to write, write  “Number Of Records:” in same text box.

Step 6: Create context variable named as “NumberOfRows”, then copy and paste tFixedFlowInput_1.

Step 7: Configure newly pasted  tFixedFlowInput_2 component.

  • Delete second last line from list.
  • One second line add this code "File Created Date: "+TalendDate.getDate("dd-MMM-yyyy HH:mm:ss").
  • on third line add the context variable. context.NumberOfRows. 

Step 8: Copy paste tFileOutputDelimited_2 and connect with tFixedFlowInput_2 using main flow. no need to do any additional configuration.

Step 9: Add tFlowMeterCatcher component and add tJavaRow and connect each other using main flow, don`t click on “Synch” button on tJavaRow. Write below code in tJavaRow component.

context.NumberOfRows=input_row.label+input_row.count;

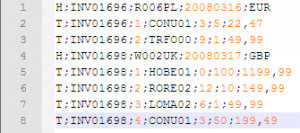
Step 10: Run the job it will create file with Header part, Data part and footer part. below is our final output.

Header and Footer Output


How to get latest file from directory

This post I will describe, how to get most resent file from directory based on display date or a date from file name.

We have below sample files in our directory and every file has date in the name of file, based on that we will decide which file is most resent rather than file created date/ modified date.

Sample xls files
Sample xls files

As you can see, we have three list of files.

  1. sales element 11 2014.xls has been modified at 28-01-2015
  2. sales element 02 2015.xls has been modified at 28-01-2015
  3. sales element 12 2014.xls has been modified at 03-03-2015

If we use file created or modified date to get most resent file then we will get ” sales element 12 2014.xls” which is a wrong file.

To get a latest file from directory we will use below steps.

Step 1: Add tFileList component and configure it get all .xls files form directory. see the image for details.

tFileList Configuration
tFileList Settings

Step 2: Add tFileProperties component and connect with tFileList using Iterator link, then provide file path and name from global variable. which looks like this ((String)globalMap.get(“tFileList_1_CURRENT_FILEPATH”)).

tFileProperties Setting

Step 3: Add tMap after tFileProperties and connect with main link and do the fowling setting in it.

  • Create output name as “FileList”.
  • Add all the source columns to this output.
  • Add new variable in tMap using variable creation, write this code in it.

row9.basename.substring(row9.basename.indexOf(“.”)-7).replace(“.xls”, “”)

  • Create new column in output with the name “DisplayDate” and datatype is Date.
  • Add below code in it.

TalendDate.parseDate(“MM yyyy”, Var.var1)

  • See the image for more details.
tMap Setting
tMap Setting

Step 4: Add tHashOutput component after tMap and connect with main link.

Step 5:  Add tHashInput Component below tFileList and link using “OnSubJobOk” trigger.

Step 6: Copy Schema from tHashOutput to tHashInput.

Step 7: Add tAggregateRow component and connect with tHashInput using main flow link. Do the basic setting like below.

tAggregateRow Setting

Step 8: Add tLogRow to check the result. you will see the output as below.

Output Result
Output Result

Step 9: Your job design should be look like in below Image.

Final Job Design
Final Job Design

Note: You can avoid using tHash***** components just use tAggregateRow after tMap and do the setting as is, it will work.

Read Multi Schema Positional File

To read a Multi schema Positional file we will use tFileInutMSPositional component, this component gives ability to read multiple schema based on certain columns value.

We are using Invoice file which has Invoice Header & invoice Details records in single file.

Sample file.

Header-Details Multi Schema Sample File

Invoice Header records start with “H” alphabet.

Invoice Details records start with “T’ alphabet.

follow the steps to read these multi schema records.

  • Create a job and add tFileinputMSPositional component.
  • Configure tFileinputMSPositional component with.
    • provide file Name.
    • row separator as per your file defaulted to “n”
    • “Header Filed Position” this is the most important filed by which component will distinguish records whether it is header or detail. in our case first letter of row which is “H” for header and “T” for detail. so we will add value as “0-1” that means start of record to 1 character long.
    • In “Records” section add two rows name it as “header” for Header records and “details”  for Details record.
    • once you add row it will ask you for schema add Header schema like below.
    • Header Schema
      Header Schema
    • Create details schema as follows.
    • Details Schema
      Details Schema
    •  Now add pattern for “header” as “1,8,6,8,3”.
    • Add pattern for details as “1,8,1,6,1,1,*”.
  • now our configuration completed.
  • Add two tLogRow component and from settings tab select “mode>Table”
  • Connect first tLogRow to the tFileInputMSPositional using “Header” link.
  • Connect Second tLogRow to the tFileInputMSPositional using “Detail” link.
  • Synch tLogRow columns.

Execute the job.  It will show you below output.

Header-Detail Output


Read Multi Schema Delimited File

In this post i will describe you how to read/process multi schema delimited file using tFileInutMSDelimited component.

here is our sample input data which has header records then its trailer records.

Invoice Header record start with “H” alphabet and Invoice Detail/trailer record start with “T” Alphabet.

Sample header-trailer records

we will use tFileInutMSDelimited component to parse these records. so create a job and drag and drop tFileInutMSDelimited component and then double click on it, it will show you another screen for metadata creation.

select our source file, then select column separator & row separator, once that is done then flow the below steps.

  • In preview window select first column which has “H” and “T” values.
  • In Schema grid click on add button and provide following values.
    • Schema=H
    • Record=H
    • Separator=;
  • Click on “OK” you will one record created with provided values.
  • Click on fetch Codes button, it fetch all the visible codes from mention file and creates schema based on column delimiter.
  • Our configuration looks like below image.
tFileInputMSDelimited configuration
  • Now go to the component setting tab and click on first schema which may look like row_A_1 click on it.
  • it will show you schema with default column names.
  • modify column name as follows.
Header Schema details
  • We are done with Header schema now do the same thing with Trailer schema and modify column names.
Trailer Schema details
  • Add tLogRow and connect to the tFileInputMSDelimited component using “row_A_1” schema.
  • Do the Same thing for “row_B_1” schema.
  • Now Execute the job your output will be like this.
Header-Trailer Output

you can achieve same thing using other ways, but trust me this is the most simple way.


Read XML with Nested Loops

In this post, I will describe you, how to parse xml having nested loops in Talend. For that I am using below XML as source.

Source XML has list of Items from a retail store,  and <item> node repeated for each item. Inside <item> node we have nested nodes for <batter> and <topping> our task is to read all the items with nested loops in their separate flow.

Image of source XML.

Sample XMl file with Nested Loops

Sample XMl file with Nested Loops

First of all you should create metadata of your XML file, but in this post I am using XSD to populate source schema in tXMLMap.

Create new job and add tFileinputXML component and configured it as shown in Image.

Image of tFileInputXMl component.

We have set XPATH Loop to “/items” as this is the root node of XML file. then I have created one column with “Document” data type. see in Image.

Set tFileInputXML for Nested loops

tXMLMap and connect with tFileinputXML component using “Main” link.

Open tXMLMap right click on “items” node at right(source) side then select “Import from file”.

provide XSD file it will automatically create all sub nodes. like below image.

Set batter & toppiq as “loop” element by right click  and select ” As loop element”

Configure tXMlMap
Configure tXMlMap

Create two outputs,  “batter” and “tappinq” then drag respective columns to “batter & tappinq”

Click on “set loop function” box it will open a window wherein you have add new row and select respective loop path e.g. for “toppinq” i will select “toppinq” loop like wise batter for “batter” output.

Your Final settings looks like below image.

Configuration tXMLMap output with loop path

we are ready to get the result add tLogRow components for each  of the output and execute the job it show results shown in image.

Nested XML loop parse Output


tFileList Exclude Mask

This post I will describe you how to exclude files using tFileList component.

Below are our sample files which stored in folder.

Sample Files
Sample Files

From above file list we want to read only files with name starts with “Orders_” and ends with “.csv” therefore we are using tFileList mask to get the file list.

Add tFileList component and configure as follows.

tFileList1 Configuration

tFileList1 Configuration

Now you will get all the files from mentioned location but we want to exclude two files which contains “US or USA” so let’s use Advance setting of tFileList and configure as follows.

tFileList configuration

Here you can see I have use regular expression to exclude files and the regular expression is “Orders_US.*” after running job I will get only one file which I wanted to process here is the output.

tFileList Exclude Mask Output

If you want to exclude multiple types of file then use comma to separate each pattern like below.

“(Orders_US.*),(Orders_UAE.*)”

Validate CSV headers in Talend.

File processing is a day to day task in ETL world, and there is huge need of validation regarding source file format, headers, footers, column name, data type and so on, thanks to tSchemaComplianceCheck component which can do most of the validation like.

  • Length checking.
  • Date pattern/format.
  • Data Types

But does not support number of columns and column sequence validation, that which we have to manage using java code, in this post I will describe you how to validate column names and their sequence.

This is our final job design.

Complete CSV Validation Job

Let’s start with adding first component to job designer. Add tFileList and configure to get expected files.

Add tFileInputFullRow component and configure as shown in below screen.

tFileInputFullRow Configuration

tFileInputFullRow Configuration

  • Add tMap and connect with main link from tFileinputFullRow component.
  • Add tFixedFlowInput and connect with lookup link to tMap then configure as follows.

Note: if you have your refrence header row stored in file or database you can use it instead of tFixedFlowInput.

tFixedFlowInput Configuration
  • Configure tMap as follows.
    • Make inner join with your reference line and main line of input.
    • Add two outputs and named it as “matching” and “reject” respectively.
    • In the reject output click on setting “catch lookup inner join reject”=true
    • Add source line to both the flows.

See image for more details.

tMap Setting
tMap Setting
  • Add tJava next to tMap and connect with “matching” flow.
  • Add another tJava next to tMap and connect with “reject” flow.
  • Add tFileInputDelimited and connect with first tjava using “iterate” flow.
  • Configure tFileInputDelimited as shown in below image.

Add tLogRow component to see the output from file.

tFileInputDelimited Configuration

You can see that for each file whole sub job will be executed if it is matching with header row then it will be used for reading.

You can connect reject row to make a note of rejected file based on your requirement.

Create File Name with Date and TimeStamp

This post I will describe you how to name a file with Timestamps in Talend. File name format depends upon your business requirement, for example your business requirement is to name file with time stamp like “Order_yyyyMMdd_hhmmss.dat” so it will have time stamp up to seconds hence you want to get the same file for reading or any other purpose you will not find out easily therefore you can maintain file names in variable to access it later.

In our scenario we will create a file with above name format and then same file will be used to read and display result after reading will use same file copy to the same day folder name.

This is our final job design.


File Name With Time Stamp
  • Create context variable context.FileName as string to hold the file name.
  • Add tJava and write below code in it.

context.FileName=TalendDate.getDate(“yyyyMMdd_hhmmss”);

  • Now add tRowGenerator to generate dummy data ( you can use your source e.g. database, file or anything) and link with tJava using “OnSubJobOk”.
  • Add tFileOutputDeimited component and connect with tRowGenerator using main flow then configure as shown in below image.
Add File Name for Time Stamp

As you can see we have assign file name from context variable, in the same way you can add dynamic file name like “D:/Orders”+TalendDate.getDate(“yyyyMMdd_hhmmss”)+”.csv” this.

Our source file created with expected file name that is “Orders_20150129_134310.csv”, now we want to read same file so follow below steps.

  • Add tFileInputDelimited and connect with tRowGenerator using “OnSubJobOk” link.
  • Configure tFileInputDelimited component as shown in below image.
tFileInputDelimited
tFileInputDelimited configuration & setting

You can observe that we are using file name in same way we did for file creation, because we don`t know how long file creation will take if it exceed in more than one second then you will miss the file name previously created to avoid that we are storing file name in context.FileName variable.

Now you have read the file and want to copy it to some other location, but it should be stored in folder with today’s date when it was created to do so,

  • Add tFileCopy component and link with tFileInputDelimited using “OnSubJobOk” link.
  • Configure tFileCopy component as shown in image.
tFileCopy Configuration

You can notice that we are using same file name as we are using for rest of the component above. And the only change here is we are creating directory with Dynamic name by using “D:/”+TalendDate.getDate(“yyyyMMdd”) this code. This component allows us to create directory if it is not exist with provided name.

We have moved entire file from source location to dynamically created folder. Same you can use dynamic file or directory name as per business need.

Read XML with Optional Elements

This post I will describe how to parse XML with optional element.

We will use below source xml file which has three customer details, along with awards details, and <CUSTOMERAWARDS> is a optional xml element.

Sample XML file
Sample XML file

We will parse this file using tXMLMap component. so fist of all add tFileInputXML and configure as below.

  • Assign source file path
  • Create single column in schema named as
  • Create CUSTOMERS column with “Document” data type in schema.
  • Put loop Xpath query = “/CUSTOMERS”
  • In Mapping section add XPath Query =”.”
  • Select Get Nodes check box.

Add tXMLMap component and connect with tFileInputXML component using Main link and create source tree structure as shown in image.

Note: You can create create sub elements manually or  it can be  populated from XSD file or from repository.

Add two Outputs and drag and drop relevant source columns to output (Refer image).

tXMLMap Configuration

Click on first output`s “set loop function” short menu and add one sequence then select xpath = customerid xpath, see the image for more details.

tXml Map First Output

Our first Output is ready now you have to configure second output so follow the steps we did for first output and select xpath= customerawards, see the image for more details.

tXml Map Second Output

Add tlogrow for each output and then execute the job you will see output like below. If you observe, customer id 1236 it has no awards extracted but customer id 1234 and 1235 awards extracted completely.

OutPut
Out Put